You can improve your ceramic tiles design, polish your space, and increase the resale value of your house by utilizing an intriguing patterns or layout technique. To plan your cuts and make sure you like the pattern, we always advise dry fitting your pattern. Why wouldn't you want to lay things out first with an installation that will be there for so long? Spend some time perusing finished spaces to get inspiration for what you can do with your own. Consider the number of cuts required for a pattern, the quantity and desired width of grout lines, and whether or not anything will obscure the pattern (area rugs or furniture on a floor, appliances in front of a backsplash, etc.). 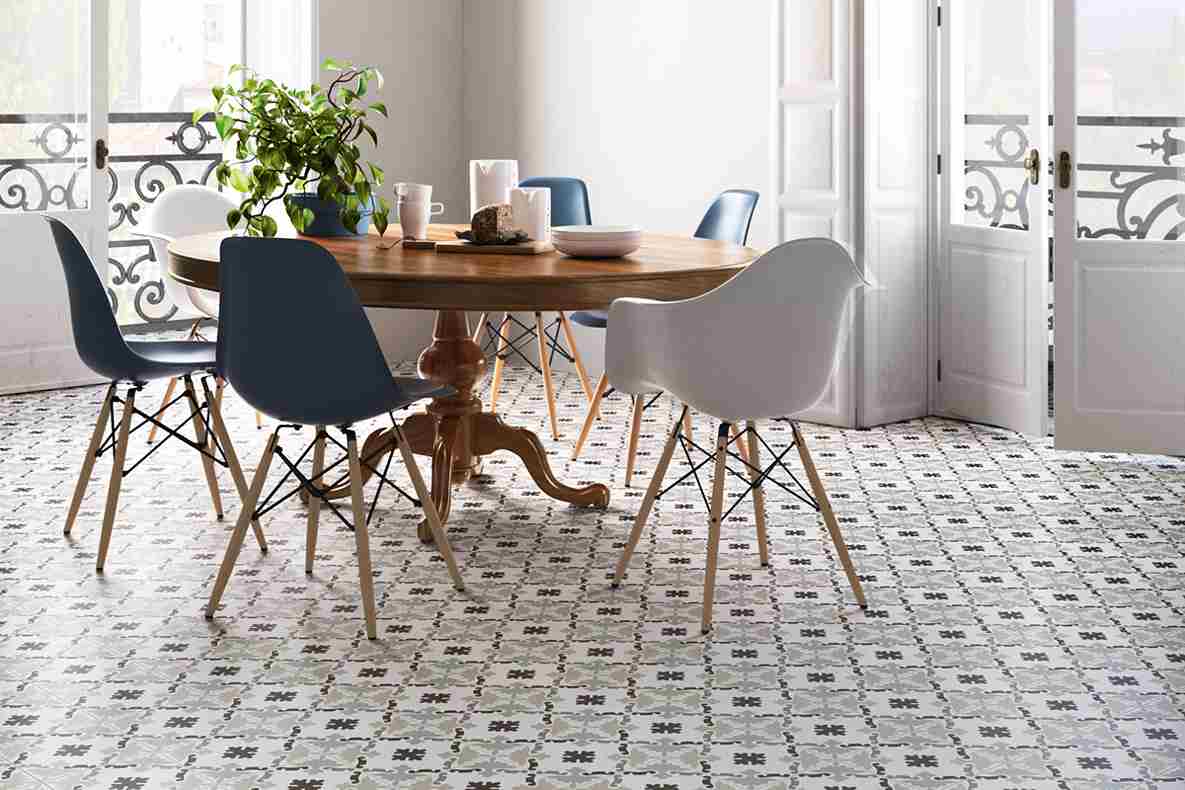 Is your space lengthy and cramped? Does it have a lot of bends and obstacles? What will happen to your grout lines? Where will the cuts be made? Your installation will go smoothly and you'll feel more confident when making decisions if you set aside some time to plan in advance. Grid, Square-Set, or Stacked-Set Pattern The most popular and straightforward tile layout is a grid, which is very easy to do. The amount of cuts required will be reduced by setting your tiles square with a corner. Unfortunately, when paired with a simple, neutral tile, this pattern can appear dull or clinical. To add interest, try adding stripes or color blocking. Think about using a checkerboard design or adding an accent stripe. The secret to this pattern is to avoid using "slivers" (thinly cut tiles) in sections that are visible, as this appears amateurish and unprofessional. When your lines are parallel to your walls, dry-setting your tiles is crucial since this pattern will draw attention to any poor cuts or strange angles. Try shifting the design by half a tile so you have slightly more than half a tile on both ends of the room if your arrangement leaves a full tile on one end and a narrow cut tile on the other. On-Point or Diagonal This is a layout strategy rather than a specific pattern. Any pattern can be rotated at an angle to give it an instantly dynamic, intriguing appearance. A small space might appear larger because to the diagonal design. A diagonal design will conceal irregularities in your walls if they are not completely square. Setting tiles on a diagonal, however, increases the amount of cuts you must make at the installation's perimeter because the tiles no longer line up with your walls.
  The eye is drawn to focal points by lines. Make a decision as to what you want the room's focal point to be, and then use the tile arrangement to draw attention to it. Make the room appear larger, draw attention to your luxurious bathtub or your beautiful vanity, or emphasize the length and draw attention to the view outside a window. For added interest, the mosaic in this bathroom was placed diagonally. It replicates the flow of water from a shower head. There is less cutting required than when installing all of the tile diagonally by just doing the backsplash and one vertical stripe in the shower. Actually, these rhomboid and trapezoid tiles are positioned parallel to the walls (meaning fewer cuts to make). The attention is drawn to the cafe counter by the strong diagonal lines created by the high contrast colors. Brick Pattern, Running Bond, or Offset Lay tiles of any size in rows, shifting each row as you go to produce an offset design. The offset/brick pattern may have a number of possible outcomes. The most popular brick/running bond design, the 50/50 offset, gives a powerful, conventional appearance. It's advised against using a 50/50 offset when placing larger tiles with a long shape (6x24" tiles, wood plank tiles, etc.), as these tiles may have a slight bow in them. Lippage will result from a 50/50 offset, which places one tile's highest point next to its lowest position. For their lengthy tiles, the majority of tile producers advise a 30/70 offset or less. A varying offset (such as 40/60, 30/70, etc.) gives a look that is softer and more natural. A Tile Lines Tip: You'll have very little waste if you start the next row with the cut pieces and scraps from the previous row. Use your leftovers! While an irregular offset on the floor is the most common and most natural looking wood tile configuration, an irregular offset applied vertically on a wall can produce an organic waterfall or bamboo impression.
  Strategic planning will reduce the number of cuts you need to make because your cut piece from one row can begin the following row rather than being discarded. Hopscotch or Pinwheel The "hopscotch" or pinwheel pattern is simpler than it seems to be! Align any two squares or rectangles of varying sizes on one side, then do the same with the other. By using this pattern, you can add two distinct types of materials to the same area and give it a dynamic, diversified look. Use two sizes of the same item to create a subtle movement, or for a more aesthetic impact, use a material or color that contrasts. Herringbone Pattern Simply pick any rectangular tile, turn one so that the two are perpendicular to each other, line them along one side, and repeat to create the herringbone pattern. With your two tiles, you are essentially making a L shape, and this L will nestle next to other Ls for a straightforward repeating pattern. The herringbone pattern, which creates a dynamic zig-zag that works in both traditional and modern settings, may be applied to any size rectangle. Discover the distinctions between the herringbone, chevron, and flame stitch patterns in this fantastic Houzz post!
  Chevron Design Similar to the herringbone pattern, the chevron pattern produces movement by aligning rhombus shapes to produce an arrow-like effect. This pattern requires a little more skill since, unless your tile is already cut to form a chevron, you will need to cut each and every tile individually to produce the dynamic points of the chevron pattern. This process will take a lot of time and money. For simpler installation, some rectangular tiles will have a chevron pattern printed on them. Verify that the design and color match up from tile to tile. A lot of mosaics already have chevron forms integrated into the mesh sheet; you just need to cut the sheets at the installation's perimeter. Rhomboids that have been cut are included with a few modular lines and can be used to make a chevron pattern. A zigzag design can be made using contrasting colors, or a more subtle pattern can be made with just one hue. Examples of single-color chevrons, gradients, zigzag stripes, and even a houndstooth pattern can be seen in the rooms below. Roman, French, or Versailles Style This pattern is conventional, elegant, fascinating, and ageless. It uses a variety of forms and sizes to give the idea of being randomly varied. As a result, in order for the Versailles pattern to work, you'll need a tile product that was especially created with that pattern in mind! If this pattern is really what you want, please let us know so we may show you many lines of porcelain, travertine, limestone, slate, or marble that have the Versailles in the right size options. To make creating this pattern as simple as possible, some lines are even sold as pattern bundles. The leading exporting team of our company would feel great to represent the high-end ceramic tiles o the customers and cooperate with professional traders around the world.
💰 Tenfold your income 💎