
Glittering glass and metal can be combined with more conventional marble kitchen backsplash ideas to create a mosaic. Choose between modern combinations of forms and patterns or pure lines. Your kitchen will undoubtedly be unique and well suited to your tastes, thanks to the marble backsplash tile ideas you come up with. Why do you think marble backsplash tiles are best? Every discerning homeowner will be drawn to the qualities of our premium marble mosaic tiles. With characteristics like these, you won't regret creating your marble backsplash tile: Naturally resilient Backsplashes made of marble are made of a tough, long-lasting substance by nature. They will last for many years as a permanent fixture in your home and are usually fairly water-resistant. Simple to maintain: These tiles don't require hours of complex polishing to bring them back to life. With a few passes of a moist rag, you may bring back their uncomplicated beauty. Do not be intimidated by cleaning your marble backsplash tiles. Design adaptability: A marble backsplash will still be in style even if other aspects of your home change in the coming years. They are lovely and adaptable, with excellent options for future flexibility. Ideas for marble kitchen backsplashes might serve as the foundation of your upcoming design endeavor. For more ideas, check out the fantastic selections we've included here. A white marble backsplash is a classic and time-honored choice for designing an attractive kitchen since it symbolizes serenity and purity.  There is a vast range of white marble tones that can complement many kitchen styles, from very pure whites to more greyish ones. Here are six stunning white marble tones that are widely available. Another common variety of marble available is white calamata marble. It can be recognized by its fractured pattern and its veins of grey that are flecked with tiny notes of amber and gold. It is more expensive since it is scarcer than Carrara Marble. For marble kitchen backsplashes, the herringbone pattern is a timeless design that will never go out of style. Additionally, the elegant marble and this distinct pattern work together to create a sleek and striking focal point between the cabinetry. Subway tile backsplashes are a tried-and-true complement to any kitchen, regardless of the kitchen's modern, traditional, contemporary, or eclectic style. And marble subway tiles can be ideal for you if you want your backsplash to have an opulent impression. Marble tiles in grey and white complement subway patterns well. Arabesque backsplash tiles are a type of decorative art that gives a room a classic appearance. Between the cabinetries, using marble tiles in an arabesque backsplash pattern will provide an opulent, classic charm. You can add contrast or finish off this classic appearance depending on your preferences. For this pattern, white and grey grouts work better. A sleek focal point for kitchens is created when the chevron backsplash's contemporary appearance combines with the marble's elegant and opulent feel. Backsplashes with marble chevrons look lovely when they are grouted in white and grey. Consider using gold grout if you want to add some shine! Hexagon backsplash tiles are a lovely choice that is now quite popular. These basic geometric shapes have a contemporary appearance that makes a stunning focal point, especially when combined with real marble. This stylish mix enhances the overall appearance of kitchens and looks amazing.
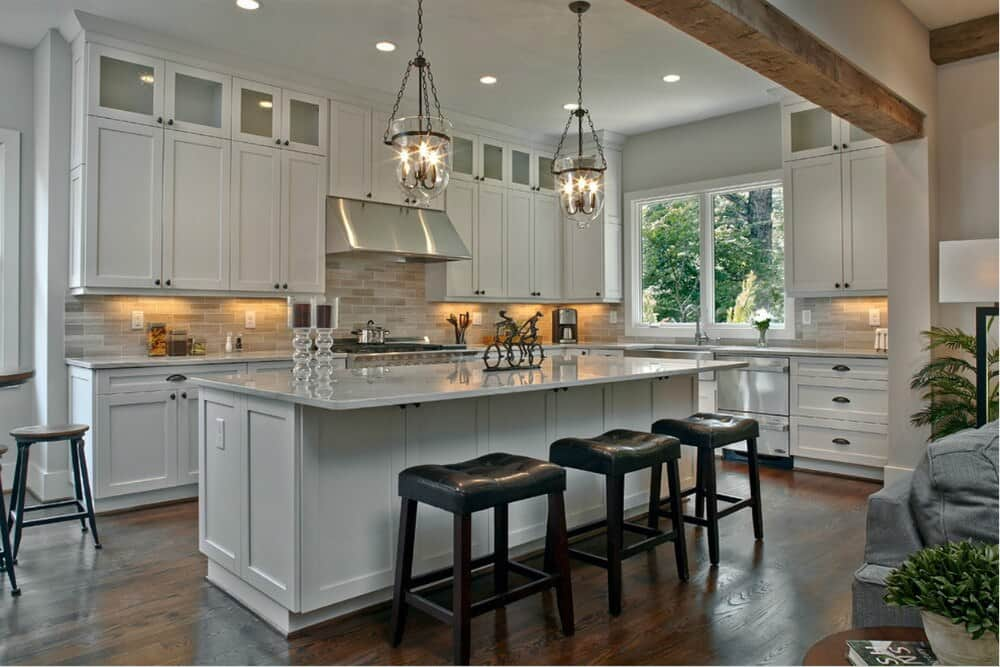
Marble Kitchen Backsplash
Stones are tumbled for this finish, which creates a natural and aged rustic appearance, as opposed to being polished. The tumbled marble's natural. A warm appearance gives kitchens depth and character. Whatever the style of your kitchen, tumbled marble backsplashes are elegant, timeless, and add visual interest to the space. Additionally, it is a versatile finish that complements other materials like ceramic tiles or mosaics made from recycled glass. Patchworks can be made by combining random patterns and colors. This tile costs more than other tiles because the process frequently results in more broken tiles. The most traditional and typical marble finish is polished. It offers an opulent, high-end appearance that can give any kitchen sophistication. A polished marble's glossy, light-reflecting surface lets the color of the stone show through to the fullest, and its lovely veins give it a classic, refined appearance. To create a crisp, clean appearance, choose a white marble-like Carara. To add drama, choose a black marble-like Marquina. The majority of the tools required to install marble backsplashes are the same as those used for other stone installations. Additionally, you must determine the square footage of each area that will be tiled before beginning the installation. The procedure will be the same whether you are working with individual marble tiles or a solid slab backsplash. Step 1: Organize the area To start, make sure the walls and backsplash are spotless. You can use a cloth to wipe down the area if you are working on freshly installed drywall or an empty wall. Use a 5-in-1 tool to remove your outdated backsplash material. Scrape off any glue that is left behind after removing the tiles, then fill in any holes and cracks to make a stable base for the replacement tiles.  Step 2: Sand the wall The surface must be smooth before tiling can be done. To achieve a homogeneous surface, sand the area with sandpaper. Then use a sponge vacuum to clean the area. Step 3: Seal the wall This phase can be completed with a straightforward sealer-primer. Making a thin barrier between the backsplash and the wall is a smart idea. You can now begin installing the tiles. Step 4: Plan the tile layout Find a central location to put tiles if you're working with them. The tile design will appear lovely in this manner. Step 5: Tile the backsplash Spread a small portion of the wall with the tile adhesive after mixing it in accordance with the manufacturer's instructions. The adhesive dries rapidly if you spread it out across all surfaces. To seat the first piece of your backsplash in the glue, press against it with a rubber float. Once all surfaces have been covered, repeat this process. Step 6: Seal marble before grouting. Marble is a porous substance that readily absorbs liquids. Therefore, sealing it before grouting is crucial. Use a soft cotton rag and a stone sealant to rub the tiles' entire surface. Step 7: Apply the grout Check the grout's instructions before mixing it. Then, using a rubber float, apply it diagonally across the tiles. After waiting 10 to 15 minutes, sponge-clean the area. It's crucial to move in a diagonal motion to protect the grout lines.
 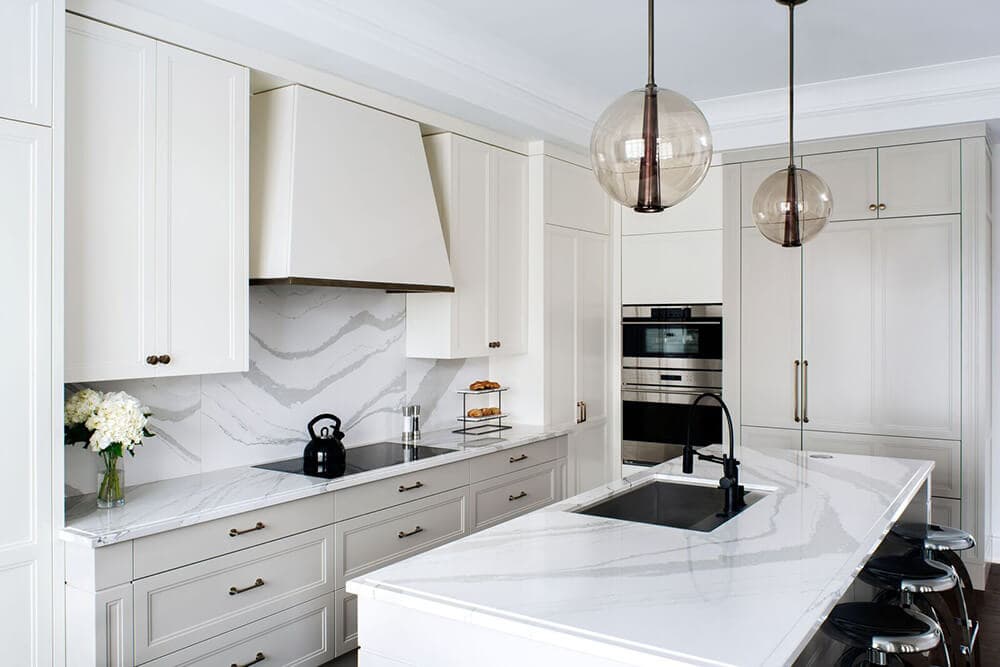 Step 8: Grout sealing Check the manufacturer's directions on your grout sealer before applying it after the grout has dried. If there are any expansion gaps after sealing, you can fill them with silicone sealant.