One of the most important parts of renovating a house interior is installing new pattern ceramic tile in places like shower walls but we must remember that the installation of ceramic over on to a surface where you already have ceramics is different from when the ceramic is being installed on a new surface. Ceramic tile installation Ceramic tile is a popular, resilient, and simple to install and maintain flooring material. When remodeling a bathroom, kitchen, or any other area in the house, ceramic tile might be an excellent option. You only need to understand how to put out the tiles for optimum durability and minimal damage. 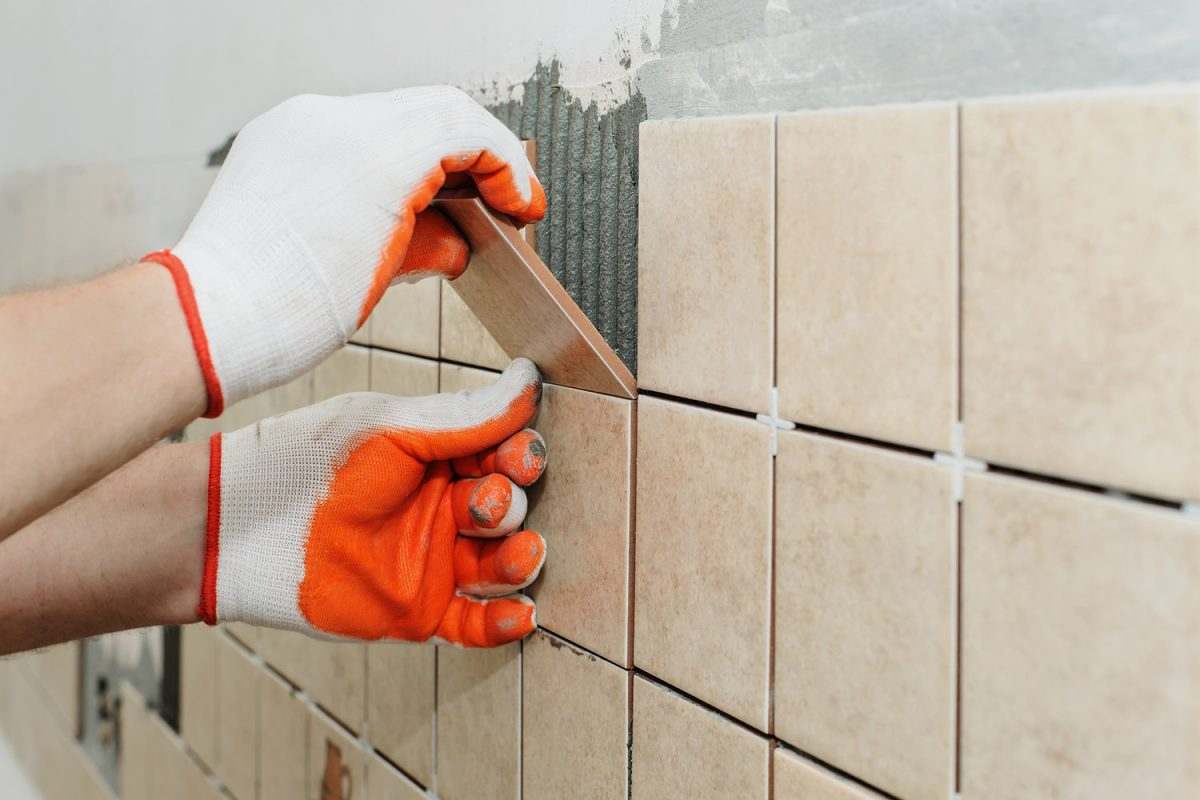 Step 1: Measure the area where you intend to install the new tile. As a general guideline, there should be at least two tiles per inch (about 1 cm) on each wall or baseboard molding. Use a straightedge and a pencil to measure, then record the measurements on the wall. Leave a half-inch (or 1cm) of space around the margins of the wall. Step 2: Clean the surface with a damp sponge to remove any dirt or debris. Apply a sealer to the entire area you intend to cover. Be cautious to avoid getting any on your tiling. Use a small brush to apply the sealant, making sure to get behind the tile seams and around any gaps or cracks. Let dry thoroughly. Step 3: Remove the tape and masking paper from the back of the tile in Step 3. Place the tile directly on top of the sealant. Be sure to press down firmly and smooth down any air bubbles. Once the tile has been pounded flat, do not move it until it has dried completely. The tile must dry overnight. Step 4: After the tiles are totally dry, you may want to lightly sand them to increase their luster. Sand each tile separately, following the wood's grain. You should just need to use sandpaper with a fine grain. Step 5: Finally, apply a finishing coat of wax to the tiles to preserve and seal them before installation. Wax imparts a glossy sheen to tile and repels moisture. Installation of Porcelain Tiles The only difference between porcelain and ceramic tiles is that porcelain tiles are slightly softer. If the room size allowed, they may be easier to cut and install because to their softness. Step 1: Thoroughly clean the surface. Utilize a wet rag and scouring pads to clean the floors. Then, use a vacuum cleaner to collect dust and loose crumbs.
  Step 2: Lay the tile according to the previous installation instructions. Utilizing a wet cloth, remove any air bubbles. Utilizing a clear silicone adhesive, seal the tiles. Step 3: Wait twenty-four hours before walking on newly laid tiles. Do not walk on the tile until it has fully cured. Installation of Laminate Floors Laminate flooring is an easy-to-install form of hardwood flooring. This flooring comes in a variety of styles, shapes, sizes, and colors, and is frequently chosen since it is less expensive than traditional hardwood flooring.
- scotch tape
Commonly employed in construction and home repair projects, duct tape is a strong adhesive strip. Its adhesive side makes it perfect for tiling, but improper application can lead to cracking and water damage. To prevent bathroom tiles from cracking due to temperature variations, ensure that they are fitted correctly. If they are not, they must be repaired before duct tape is applied.
- Tiles
Tiling is an excellent option for bathroom installation. They are attractive, durable, and offer personality to any room. Numerous kinds and patterns are available at each local tile store. There are ceramic, porcelain, marble, glass, and composite options available. Tile installation demands time and ability. Tile installation requires precise measurements and placement. After placing the first row, indicate the endpoint of each succeeding row. Utilize a straight edge to align wall tiles. Once the full length of the wall has been set out, remove any extra mortar, sweep away any debris, and fill any gaps between tiles with new mortar.  This enables appropriate drainage and prevents moisture accumulation. Allow the cement to fully dry before installing fresh tiles.
- Mortar
Mortar is a mixture of sand, cement, and water that is used to bind and stabilize bricks, stone, tile, and wood. A mortar mixture of high quality should harden, attach without crumbling, and allow for the expansion and contraction of the material to which it is adhering. The weight of quality mortar is measured in pounds per cubic foot (PCF). Purchase enough mortar to complete the task at hand. If only one layer is required, purchase one bag of mortar. If multiple layers are necessary, buy two bags of mortar.
- Sand
Sand is a natural substance that helps bind mortar particles together. It is ideal to utilize clean, fine-grained, white sand. Purchase sand in bulk quantities. Before combining the sand with the mortar, scrub it with a wire brush or vacuum it. Thoroughly combine equal parts sand and cement. Slowly add water to the mixture until it is well combined. If you do not have a scale, measure the water and add more until the mixture becomes stiff and cohesive. A good rule of thumb is a ratio of 14 cup of water to 2 cups of cement. The mixture should be lump-free and uniformly smooth.
- Sponge
Absorbent and ideal for cleaning up spills, a sponge is an ideal material for sponges. Use only clean, preferably white sponges. To prevent mold, immerse the sponge in warm water and allow it to dry naturally. Ensure that the sponge is cut into regular shapes and sizes so that it fits neatly inside the tiles. 
- a measuring tape
A tape measure is an instrument for accurately measuring distances. A measuring tape is utilized to determine the distance between two places. These points could be windows, doors, staircases, and other items. Take thorough measurements and guarantee that they are accurate. The measurements must be exact and precise. In addition to reading and writing numbers, you must also be able to measure accurately.
- Straight margin
Straight edges are measuring, marking, and layout instruments. Measuring with accuracy and precision requires a straight edge. It decreases the likelihood of measuring errors and blunders. The majority of straight edges consist of metal and plastic. Straight edges made of metal are stronger and more durable than their plastic counterparts. For carpentry and woodworking, metal edges are suggested; nevertheless, plastic edges are simpler to carry and hold while working with tiny materials such as tiles. Select the appropriate straight edge for the job.