drill ceramic tiles purchase price+Quality testing
ceramic tiles are tough to drill. So, it is important to know how to drill a hole with ease. So, you've finished your pasting job and everything looks great - congratulations!
ceramic tile hard works
But now you are worried that installing bathroom fixtures, shelves, or other accessories by drilling the tiles will ruin the hard work. Fear not, because we've put together this step-by-step guide on how to drill tiles that will get you a good job and prevent your tile from cracking in the process.
Before you think about drilling newly installed tiles, make sure you know exactly what you are drilling. Porcelain and natural stone tiles are much stronger than ceramic tiles, which means you have to put in a bit more effort to get to the other side.
Not only that, but you will need a professional drill designed to penetrate hard glazes and porcelain body materials.
It goes without saying that a power drill is needed to perform this task, but the most important component to successfully and efficiently drilling through tiles is the drill bit itself.
You should never use old or worn drill bits - they are not as effective as new ones. If you use an old one, it is less likely to perform at its optimum capacity and you are more likely to damage the tile surface when drilling.
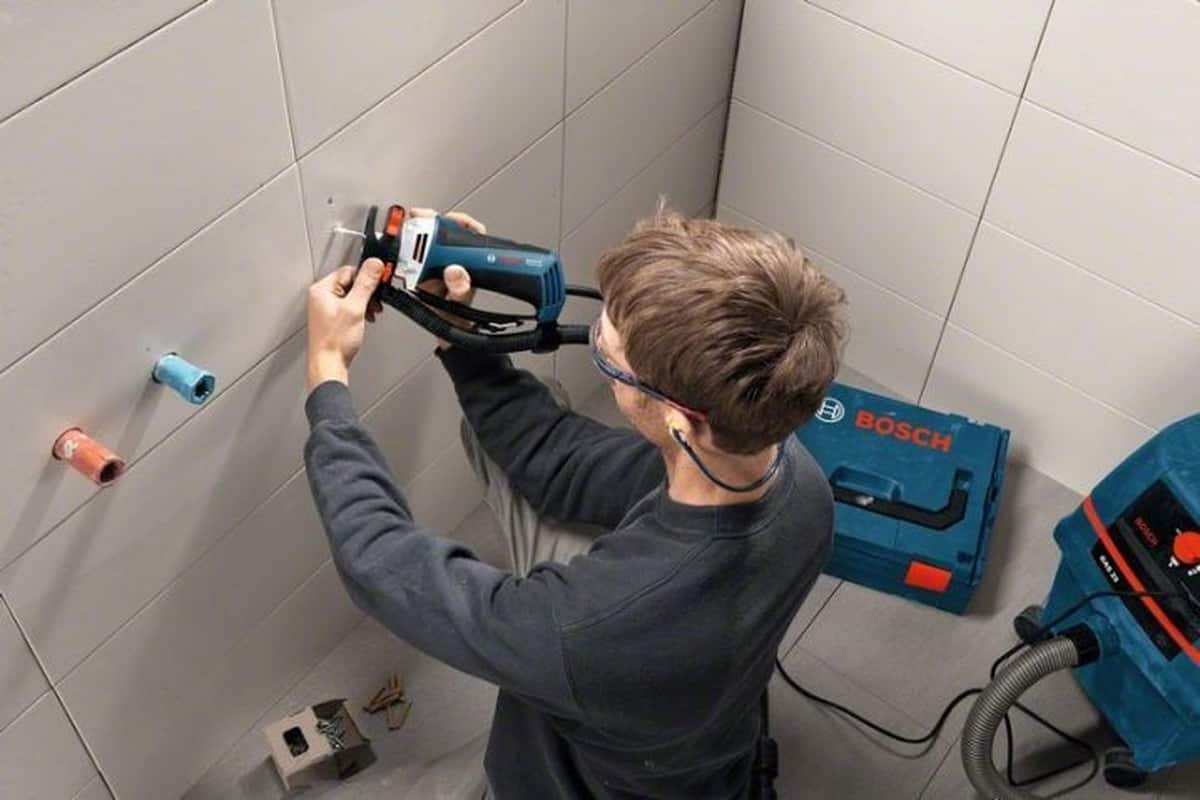
It's also a good idea to invest in safety goggles and a dust mask before drilling the tile, as depending on the density of the material being drilled, many debris particles can be thrown into the air. Latex protective gloves are also always useful.
As mentioned earlier, drilling through tile requires a professional drill bit - ordinary or even masonry drill bits simply won't do as they aren't strong enough to penetrate the hard surface of the tile. Instead, you should choose a carbide drill bit or a diamond drill bit.
Diamond bits are the more expensive of the two options, but even the toughest tile surfaces will withstand the rigors of drilling and won't burn out as quickly as standard masonry bits.
Carbide bits are the more common of the two, and although they are great for drilling ceramic and various glazed tiles, they are not recommended for use with porcelain.
Harder materials like porcelain, whole ceramic, vitreous ceramic, and quarry bricks don't just require more elbow grease; you will also need a diamond drill bit.
Anyone who has ever tried to drill a hole in tile knows that the surface glaze makes it difficult to hold the drill steady on the surface at first.
You need it to grip the tile and not slip on the surface. To create some tension, consider using tape over the area you are drilling.
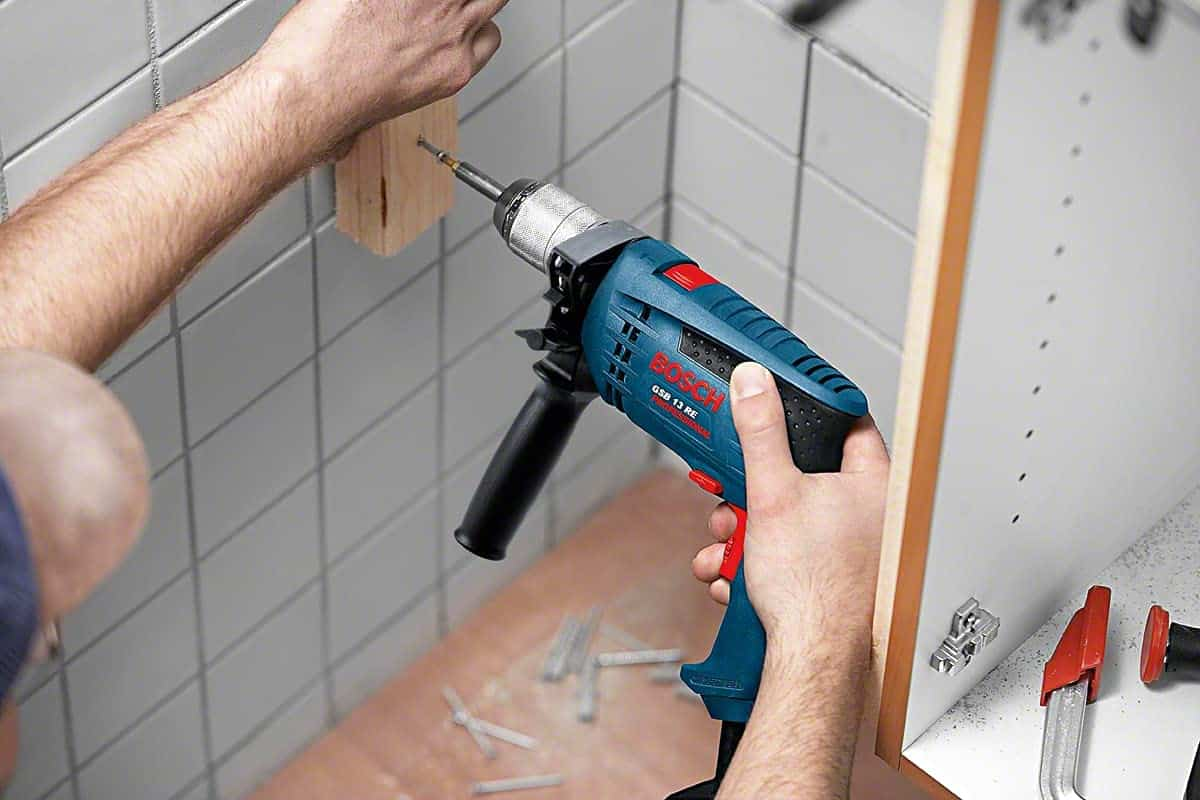
Measure (then re-measure!) the area you need to drill and mark an X on the masking tape. This will provide a surface for the drill to grip when drilling begins. You can also consider creating a small formwork from a small piece of wood if you have a lot of holes to drill.
Simply drill a hole in the wood of the same diameter as the drill you will be using, then place it on the surface of the tile and use your bare hands to hold the hole in place as a guide for drilling.
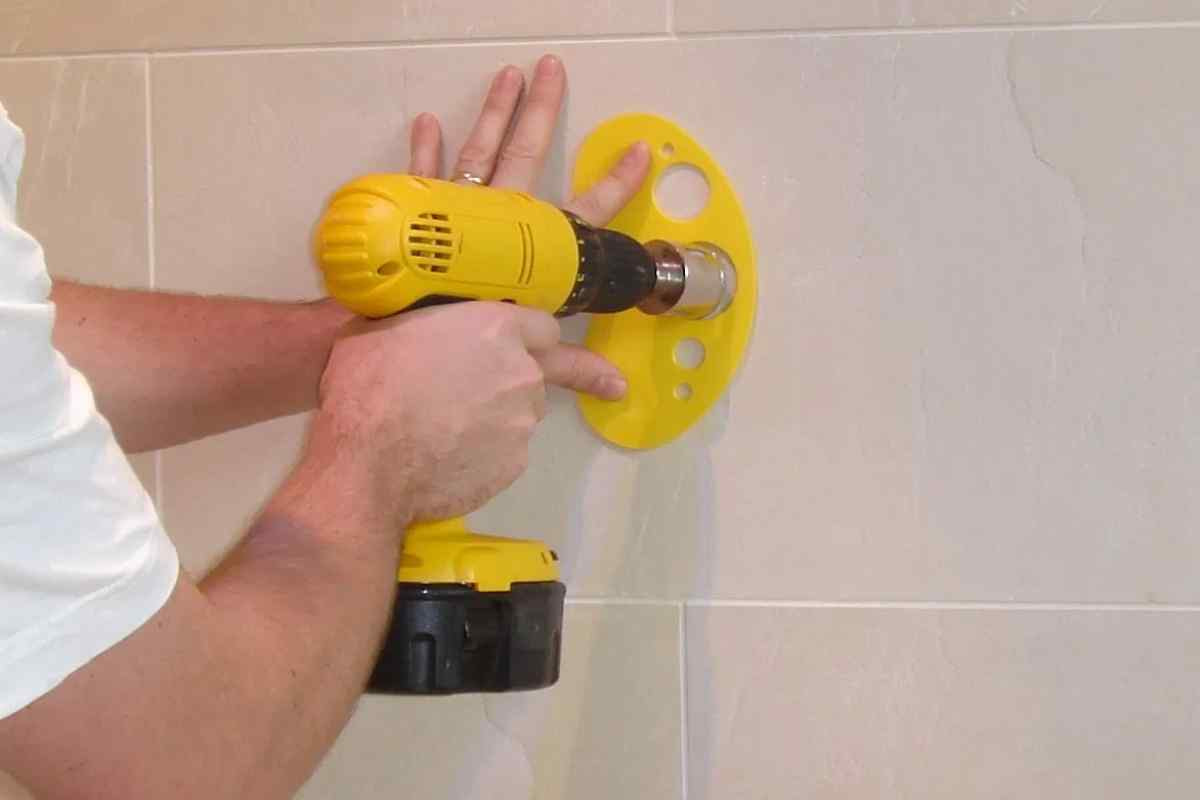
Special accessories called drill guides can also be used to increase accuracy when drilling through tiles. Various tile tool manufacturers produce these tools, which usually come in the form of a plastic casing that is attached to the tile and then drilled (similar to the wood block method above).
Other types include steel plates with pilot holes which are attached by suction cups to the surface to be drilled so that horizontal and vertical holes of a specific diameter can be drilled with precision.
ceramic tile hard enthusiast
Although these types of accessories can cost a little money, they can be used over and over again, making them a great investment if you are a DIY enthusiast. You've done all the prep work, you've measured, and you've got all the right equipment - it's time to start drilling!
As already mentioned, tiles (especially porcelain and natural stone tiles) are very strong and designed to withstand whatever is required for home and commercial use. While this is generally a good thing, it can also make drilling through tiles very difficult if you're eager to tackle it.
It may be tempting to turn on your drill and let the leather break through the glaze, but it's a surefire way to ensure that the drill overheats and generates vibrations that can crack and destroy the tile.
Take your time, start at low speed and apply even pressure until you've had enough of the top coat of glaze. Once you've penetrated the initial layer, you can gradually increase the speed and pressure as needed (but not too much!) to break through the tile to the wall.
Once you've broken through the tile and hit the wall surface, keep the drill slow and steady so you don't blast the wall, as this could mean your wall anchor or dowel won't hold properly. You may need to replace the bit depending on the material that makes up the substrate.
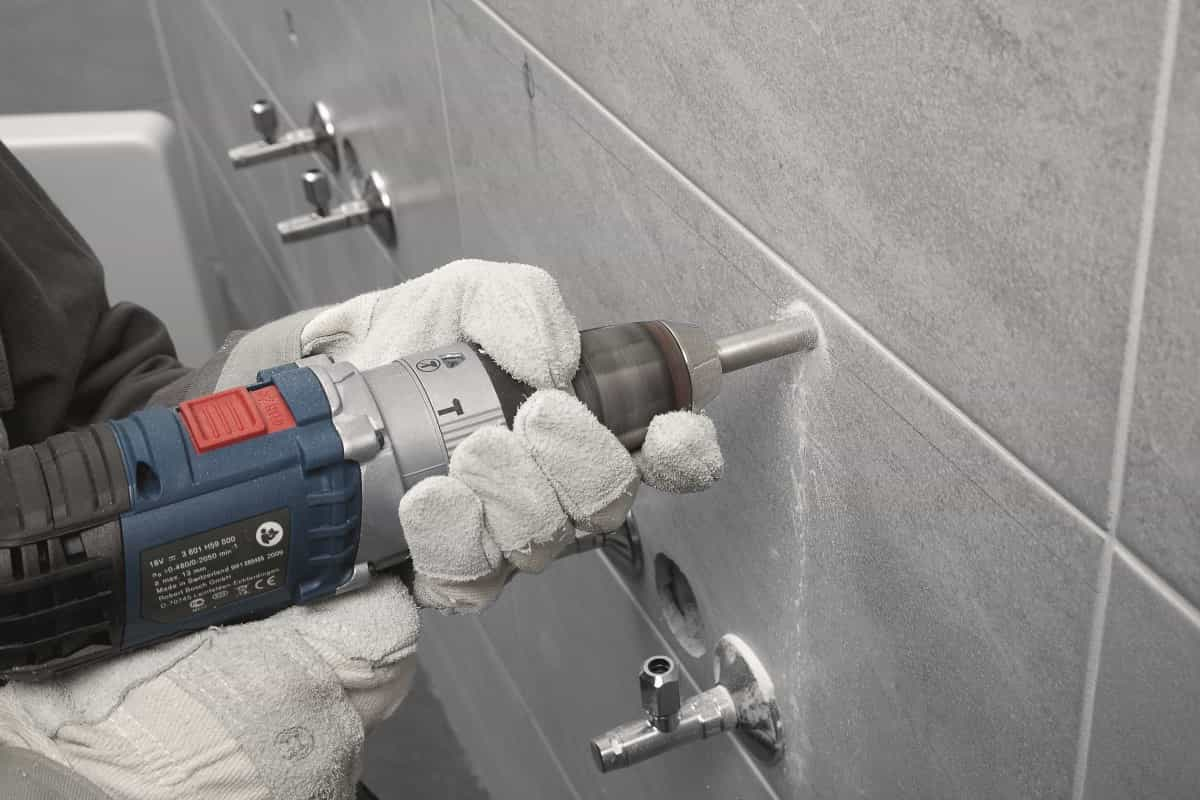
The secret to successful tile drilling is to keep your drill cool. But how? We hear you ask. Well, get rid of the images of ice cubes and small handheld fans, because all it takes to keep the drill from overheating is some good old H2O (that's water, fact lovers).
Simply dampen the sponge and dab occasionally to cool. Alternatively, you can place a damp sponge under the drill while you are using it - this will not only prevent the drill from overheating but will also catch dust and drilling debris.
However, if you use any of these methods, be very careful not to expose the motorized part of the platform to water.
Drill tiles a hole with ease
A challenging task for DIY projects is to drill tiles into a hole with ease. If you're willing to spend a little money, tools like the Multidrill Spray System from the leading maker of tile tools and accessories Rubi include a built-in cooling system to keep the drill bit cool while in use.
This type of equipment comes in handy when using carbide drill bits because they shut off once they get too hot and need to be kept cool all the time. Diamond-tipped drill bits will continue to work even when heated, as long as you allow them to cool regularly.
However, if you want your workout to last, the main thing to remember is to keep it cool and not apply too much pressure.
Once you've broken through the tile and hit the wall surface, keep the drill slow and steady so you don't blast the wall, as this could mean your wall anchor or dowel won't hold properly.
It's a good idea to change the bit depending on the substrate the tile is attached to. So if it's concrete/stone you'll need to use a proper masonry bit, and fiberboard or wood you'll need wood. The cement backing used behind tiles in wet areas such as showers and toilets can be drilled with a standard drill or even the drill you use to drill tiles.
The tile is extremely unlikely to be installed on any metal or alloy, but there may be metal spacers or brackets behind the substrate - if you need to drill into it, a standard high-speed steel (HSS) drill should do the job. Case For stainless steel or stronger metals such as cast iron, black oxide, or cobalt steel bits is recommended.
If you follow these tips, you will be able to successfully drill through the tile. There are a few very important things to keep in mind, they ensure you have the right bits, keep them cool, and go slow and steady! Drilling tiles is not a game, the greatest quality you can have in performing this task is patience.
Work in a hurry (and fail to avoid overheating) and you're pretty sure the tile you drill will crack. Whether it's a newly tiled bathroom or an existing bathroom, having to drill holes in tiled walls is a common task.
Just about anything wall-mounted — from hardware to mount toilet paper rolls and soap dishes to new medicine cabinets — requires drilling holes in the tile. In most cases, these bathroom fixtures will be installed using wall anchors, so getting through the tile is only part of the job.
You will also need to drill holes in the base plate behind it so as not to cause damage, which will prevent the wall anchors from working.
ceramic tile types
Step 1: Determine the type of tiles you have
Generally speaking, there are three types of tiles:
- Glazed tiles are the most common, present in almost all old houses, and the easiest to drill.
- Glass tiles are used more as accents and have only been around for about 15 years.
- The tiles look a lot like regular tiles but are much harder.
Step 2: Prepare the right bit for the tiles
Standard drills won't work with tile, but don't worry. Tile can be drilled with a carbide drill, while glass and porcelain require a diamond drill. Although it seems expensive, a 1/4 inch diamond bit costs less than $20, and a carbide bit the same size for less than $10.
If in doubt, buy a diamond drill. It'll puncture any sort of tile.
Step 3: Lay out the walls for success
They say measure twice and cut once, but given the consequences of drilling a hole in a tiled wall in the wrong place, it's better to measure three times and drill once. First, tape the wall in the area you want to drill.
It is easier to accurately mark the location of the holes on masking tape than on tile. For accessories such as towel rails with two mounting brackets, use a level to make sure the two sets of holes line up. Try placing hardware closer to the center of the slab - edges are more likely to crack.
Step 4: Drill slowly
Not only does the tape make it easier to mark walls, but it also helps keep the drill from slipping when you start drilling. Go slowly, especially at first, to make sure the hole ends where you want it to.
Once you start drilling, you can increase the drilling speed, but don't run it at full speed. Constant pressure and moderate speed will drill holes without overheating or damaging the bit.
Stage 5: Final acceleration
You will feel the change in resistance as the drill passes through the tile. Now you can drill faster while reducing stress. This will extend the hole in the drywall or panel with minimal damage.

drill hard ceramic costs
When you are done drilling, push the anchor into place, tighten the hardware and collect some dust.
Carbide masonry bits are the best bits for bathroom tile. Ordinary twist drill bits cannot cut through fire-cured enamels. But what if you need to drill a 2-inch hole for a piece of pipe? Contractors often use expensive hole saws with carbide-tipped edges, but there is another way.
- Use an oil-based marker or pencil to outline the hole in the tile.
- Use a 1/4" masonry bit to drill a series of closely spaced holes around the circle. Then take a hammer and lightly tap the tile along the grommet.
- Tap inside the outline and be patient as the center of the hole may take a few minutes to disengage. The edges of the holes will be rough, but you can hide them with a decorative crest.
- This drilling and tapping technique can also be used to make a square or rectangular cuts in tiles.
Got any tile drilling tips we might have missed that you'd like to share? Leave us a message or fill out a form on our website and we'll do our best to include them in this article.
If you have any questions about drilling or any other aspect of tiling, please fill out a form on our and our friendly customer service team will contact you within 24 hours and they will be happy to help.
How useful is this article to you?
Average Score
5
/
Number of votes:
1