اتصال به اینترنت شما ضعیف یا قطع است.

Buy the latest types of floor ceramic tiles

If you are not an expert and want to cover your floor with ceramic tiles DIY, you will definitely need a wholesome guide,In order to create your perfect atmosphere, and when it comes to tiling a floor, you might need a little assistance if you're not experienced.

floor ceramic tiles for living room

You will be guided through each step in this manual. Regardless of the tile you've picked or whether you're tiling a wooden, cement, or concrete floor. We want to work with you to finish your project and make sure that it will last for many years in your house. You will begin tiling your room from the center and move outward, one at a time, to each corner. Work towards the room's furthest corners first so that you can finish at the door since you'll want to be able to leave the space without tripping over your newly put tiles. Consider tiling one half of a room that you will frequently use, such as a bathroom or kitchen, and then tiling the second half of the room once the first half has dried. It will take a little longer, but it will enable the tiles to properly adhere to the floor and provide a durable surface. Tile preparation: Kitchens, bathrooms, hallways, and conservatories all benefit from having surfaces made of ceramic, porcelain, and quarry tiles. Although they are resilient and durable, they are surprisingly simple to maintain. Tiles can be installed on concrete, hardwood flooring, even existing floor tiles if you use an ultra-flexible adhesive, but you must make sure the surface is clean and properly prepared. It must be level, flat, dry, and free of moisture. The right adhesive must also be applied. If the floor has already been covered with other tiles or sheet flooring, you must first remove any adhesive. Prime dusty floor surfaces with diluted PVA adhesive and let them dry. Before you begin, be sure to read and follow the tile adhesive directions on the back of the package because they may change depending on the type of surface you're using and the type of tiles you're using. 
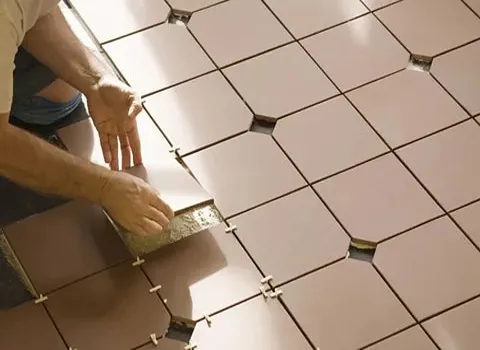
Start by placing tile adhesive on the floor at the spot you've already marked, and then distribute it over a 1 m2 area using a notched trowel. Spread the tile adhesive on the floor using the smooth side, then create ridges by pulling the serrated edge back through the adhesive. In order to assist establish a level surface, this will leave an even depth of adhesive. As you firmly press the first tile into the adhesive, twist it to help it bed in. Use tile spacers between each tile to maintain an even spacing between them when you repeat this process with the following tile. You ensure that the spacers are buried once your floor is grouted, make sure to press them firmly beneath the tile's surface. Use a spirit level from time to time to make sure the tiles are flat. If they aren't level, give them a little tap with a rubber mallet. With a damp cloth, remove any glue from the tile face; once it has dried, it will be much more difficult to do so. When all of the tiles are in place, you must wait for the glue to dry for up to 48 hours before walking on them. Tile one half of a room one day, and the other half the next, if you're tiling a space that you'll require access to, like a kitchen, bathroom, or hallway. You'll need to measure and cut some tiles to fill in any spaces between the final entire tile and the wall. Laying the tile that needs to be cut directly on top of the nearest full tile to the wall is a practical approach to accomplish this. Use this as a guide to lay another tile on top. Push the top tile all the way up to the wall while placing a few tile spacers flush on the wall. Mark the tile underneath with a tile marker, making careful to leave room for grouting. You'll need a heavy-duty cutter to cut floor tiles because they are heavier and more durable than wall tiles. Use a flat bed or electric tile cutter to cut following the drawn line while using safety goggles and gloves. After cutting, if there are any sharp edges left, file them down with a tile. Place the piece in the gap once it is the proper size to see if any additional modifications are necessary. Use tile nippers and a tile file to make small tweaks if it doesn't quite fit. Apply glue to the back of the tiles and secure them to the floor once they are exactly in place. After the adhesive has had time to set, you can start grouting. The tile is available in a variety of colors, but if you want to try something new, read our article on "Design your tiles using shapes and different grout options" to see what you can come up with. floor ceramic tiles for living room

floor ceramic tiles for kitchen

Whatever choice you pick, be sure you have enough grout for your project and that it can be used with your tiles. For information about coverage, consult the packaging. Make sure the surface is free of dust and debris, and look for any tile spacers that may be sticking up. Grout from the tub should be removed using a gauging trowel, and it should then be worked into the joints using a grout float until it is flush with the tile's surface and the spacers are covered. After grouting many rows, use a grout finisher to smooth the joints and compact the grout, leaving a tidy appearance. Before the grout starts to cure, use a damp sponge to remove any leftover grout from the tile's surface. Continue grouting, completing, and wiping as you move around the floor. After you're done, refrain from walking on the floor until the grout sets. The length of time required depends depend on the grout being used; consult the manufacturer's instructions for details. Once the grout has dried, wash the floor once again with a damp cloth, followed by a dry one, to remove any last bits of grout from the tile's surface. Use a cleaning agent if there are any difficult-to-reach spots, but make sure the grout is completely dry before allowing any water contact. After that, use a flexible sealer that matches the grout to seal the margins. This will make it easier to account for any expansion or movement between the wall and the floor. To prevent a mess, place masking tables on either side of the area you plan to seal. Apply a continuous bead of sealant while moving slowly and steadily from one end of the skirting to the other. If you'd like, you can use a specialized tool to mould the sealant for a distinct finish. After grouting and sealing the floor, if at all possible, refrain from using it for 24 hours. The ideal addition to your house or place of business, floor tiles in a distinctive way highlight the architectural design of your building. Select the appropriate tiles for your structure to give your surroundings some flair. If you want to remodel or repair your home, laying a fresh set of tiles ought to be on your bucket list. floor ceramic tiles for kitchen

floor ceramic tiles price

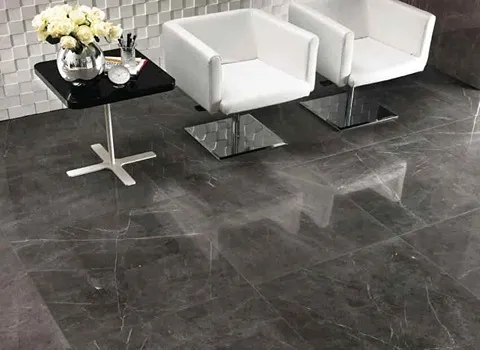
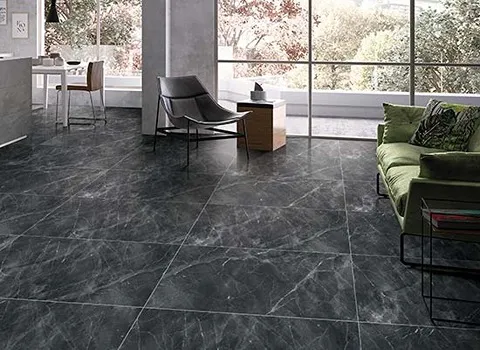
Ceramic or porcelain floor tiles are a great option for your kitchen or living area. The color grey is regarded as having a dash of elegance, sophistication, and adaptability. Nothing beats installing grey floor tiles to give your room that luxurious color. They are primarily constructed of porcelain and ceramic. Grey floor tiles come in a variety of patterns with varying chromatic intensities. For instance, some tile designs feature a lighter shade of grey, which can be employed in settings that exude a cozy vibe. Similar to how milder shades of grey could be employed in spaces with a serene or quiet atmosphere. One of the greatest options for the majority of residences and common building areas are grey ceramic floor tiles. 
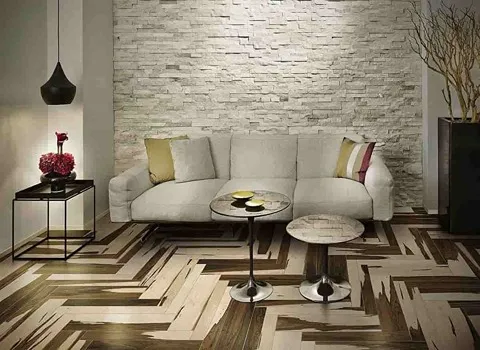
Did you know that using tiles, you may give a concrete floor the look of a timber floor? Wood effect floor tiles do indeed give you the wonderful impression of residing in a cabin remote from society. Floor tiles that give you a premium feeling as if you are walking on a wooden floor can change a space into a fancy ambiance. Wooden floors are more prone to corrosion and require more upkeep. Use wood effect floor tiles over your concrete floor instead of laying wooden floors to save time and money. These tiles, which are sometimes referred to as plank or parquet tiles, are made with colored body porcelain or stoneware and come in a variety of colors and coatings. These materials have a similar appearance to timber flooring and are the ideal replacement. Some of the tiles are glossy, giving the impression that polished wood was used to pave the floor. Wood appearance floor tiles are constructed from ceramic or porcelain parquet that closely resembles real wood. Classic wood tiles, burnt wood tiles, antique wood tiles, white wood tiles, grey wood tiles, and natural wood tiles are a few of the most well-liked varieties. Outdoor floor tiles can be used to decorate your surrounds and improve the appearance of your home. Additionally, it would provide the ideal contrast to the architecture of the entire building. A variety of floor tiles are suitable for use in outdoor gardens, dining areas, swimming pools, etc.   When viewed from the outside, white floor tiles offer your building a luxury appearance, making them the ideal accent for the outdoors. Because they are incredibly tough, long-lasting, and effective insulators, marble-effect floor tiles are also a smart choice for outdoor spaces. They are a cost-effective solution and reflect light. For your outdoor space, mosaic, black and white, and stone appearance floor tiles are all excellent options. Porcelain floor tiles are yet another well-liked option for your outdoor area because they are available in a variety of patterns and distinctive colors. Porcelain tiles are moisture-resistant, moisture-resistant, easy to maintain, and easy to clean. They are produced with stone, matte, glazed, polished, double-charged, full-body, and these other finishes. Select a style that complements your building's architecture and your interior decor. You can choose from a variety of floor tiles, including grey floor tiles, porcelain floor tiles, wood appearance floor tiles, and more. Utilize ceramic, porcelain, marble, mosaic, and other floor tiles to create the ideal pavement for your building. To leave a lasting impression on visitors, choose the appropriate tiles for bathrooms, living rooms, bedrooms, offices, and the outdoors. We will be glad to shake hands with professional importers around the world. floor ceramic tiles price  

How useful is this article to you?

Average Score 5 / Number of votes: 1

Comments (0 Comments)

💰 Tenfold your income 💎